I have made these heart blocks. The funnest part want making the heart, I taught a craft class and had about 8 girls make these, each of the hearts were a little different. Made with 4x4 pieces of wood.glitter on the heart.
Keri
Saturday, February 2, 2013
Thursday, July 7, 2011
The 5 Minute Tu-Tu
My daughter has a couple of cousins that are just 3 years older, and also the only girls in their families full of boys. Therefore, they are the perfect source for great hand-me-down clothes. Both of the cousins really love the "princess" type dresses. You know the ones, lots of frills and ruffles and chiffon. We love these dresses too, but every so often we'll get one where the frills just don't hold up to the active life of a two-year-old. We just so happened to have had one of these dresses hanging out in her closet for a few months now. My previous attempts at mending these types of dresses (especially this particular type of wear) has been less that satisfying, and I was afraid I was either going to have to cut the offending organza over skirt, or just pass on the dress completely.
Sorry I don't have pictures of all of this. Sometime my brain fails to remind me that I do own a camera.
Anyway, to continue on with this incredibly long story...I ended up cutting of the over-skirt, and the dress is adorable and much more functional now. I hated to see all that pretty organza go to waste though, so after trimming of some of the raw edges (where it was pulling away from the seams of the dress) I ran it through the serger, cased in a waistband and...Ta Da! A perfect dress-up skirt that didn't cost me a thing.
It looks especially good when paired with the Tinkerbell swimsuit. ; )
Tuesday, July 5, 2011
The Command Center
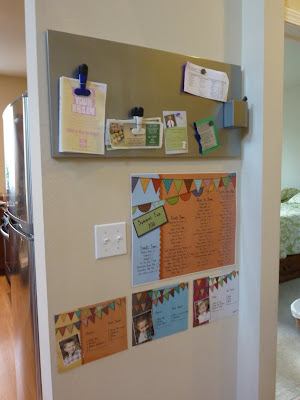
This is my new favorite wall at my house:
I call it my command center. It is around the corner from my calendar, and has a big magnet board, our summer fun chart and summer chore charts for all the kids. I laminated all of them, so they can be used with dry erase markers, and they were very inexpensive so I won't feel bad about changing the theme out in the fall. I'm also planning on adding a small dry erase board over the light switch for notes and such.
I'm fairly new to the world of digital scrap-booking, but I really love it. I use the Stampin' Up! My Digital Studio software.
I had so much fun making these charts, and am really excited to come up with more great projects to share.
Friday, July 1, 2011
Kim's House Needs Help - Part 1
We moved into our current home about 5 months ago. Unfortunately, it's taken me that long to feel like I can really start decorating. It really needs some help - it's very beige (floors, walls, ceilings, etc.). But, I've made a goal this summer (yes, summer just started for us, the kids got out of school just last week) to get the house looking good. We are renting this place, so I won't be making any drastic alterations (maybe a little paint, otherwise it will all be non-permanent upgrades). So- be on the lookout for more posts in this series in the next little while.
Today we have some vinyl words for my living/great room area. All are cut with my silhouette (love that little machine).
I'll warn you now, you're going to see a lot of vinyl art here. I'll just admit it - I love Vinyl. It's creative, expressive and fun, and easily changed when I get bored (which has been known to happen). It's also very inexpensive (especially when I cut it myself). Don't worry though, I'll make sure to add in some other projects to keep the series interesting.
Happy Crafting!
Today we have some vinyl words for my living/great room area. All are cut with my silhouette (love that little machine).
 |
| It's hard to read, but this is a quote from the last LDS general conference about temples, and the picture of the Salt Lake was taken (by me) during our recent trip to Utah. |
 |
| It hangs over my shiny (all the better to show fingerprints with) piano. |
 |
| I painted over an old sign that I didn't like, and cut new vinyl to match the rest of the room. Works well with these pictures. |
 |
| The photo wall. The wall space in this house lends itself towards lots of photos, so photos it is. With a little more word art to tie it all together. |
I'll warn you now, you're going to see a lot of vinyl art here. I'll just admit it - I love Vinyl. It's creative, expressive and fun, and easily changed when I get bored (which has been known to happen). It's also very inexpensive (especially when I cut it myself). Don't worry though, I'll make sure to add in some other projects to keep the series interesting.
Happy Crafting!
Tuesday, June 21, 2011
Diaper Clutch
So you haven't heard from us in a while...Sorry about that. Life sometimes gets in the way of crafting. But there will be more great stuff to see on here soon.
In the meantime:
A diaper clutch I made for a friend of mine. Tutorial found Here.
In the meantime:
A diaper clutch I made for a friend of mine. Tutorial found Here.
Thursday, April 28, 2011
Hair Clippies
So, now that I've given you more skirts than you could ever ask for....Here are the hair clips I made to go with them. ; )
I've been kind of obsessed with learning how to make hair bows since I found out that after my two boys I was finally getting a girl. When she was little, it was the great big bows on headbands, but since she's gotten older I've moved towards more functional, smaller clips. Maybe I need to make a few big bows again....just for the sake of sharing them here.
 |
| Fun Little Felt Flower - I wish I would have done other colors too, you just can't see much detail with the white. |
 |
| Giant Daisy - Almost too big for her head. Almost. |
 |
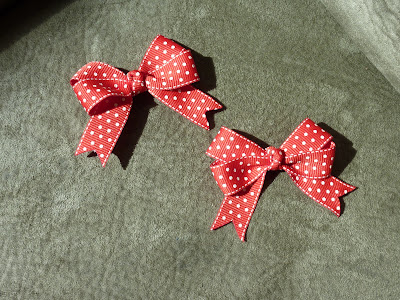
| Red Polka Dot "Piggie" Bows |
 |
| Another Shot of the Satin Flower That goes with the Easter Dress. |
Wednesday, April 27, 2011
Drop Waist Skirt
I kind of just came up with this one. I had the idea in my head, and it came out close - but not quite right. I think it's cute still, but I'll probably keep tweaking until I feel better about it.
I started out by cutting the bottom tier (about double her waist measurement) and the ruffle (3x the bottom tier). I serged a rolled hem on the tier, and along both edges of the ruffle, then ran a gathering stitch down the middle of the ruffle.
I gathered the ruffle and attached it to the bottom tier of the skirt. I'd recommend lots of measuring and pinning here - the ruffle can slip easily (not that I'm speaking from experience or anything ;) ).
I gathered the top of the bottom tier and attached it to the top tier (her waist measurement + a few inches), then sewed the whole thing into a tube, made a casing and added an elastic waist band.
 |
| Yeah, tucked in isn't the most flattering look for her cute little root-beer belly. Still like it though. |
Tuesday, April 26, 2011
TIES
Fabric ties for my son. I got a pattern from a friend, and totally love it. there is lots of super cute fabric out there and I love that it only takes a little bit of fabric.
Cards For April
Monday, April 25, 2011
Candy Cane Skirt
I wasn't sure about this one when I started putting it together. The idea came from a friend of mine, while we were looking through my fabric stash. I had these cute coordinating fabrics, and she told me about a skirt she found on etsy that was made by sewing strips of fabric together and then making a simple tube skirt out of them. I still wasn't sure, but I wanted to use the fabric so I gave it a try.
Honestly, I think this is one of my favorite skirts now. It just came together really well, and she looks so cute in it.
I started by cutting strips (more like rectangles) of the fabrics that were 4" by (the length + 1" for waistband.) I serged the strips together until I had around 45" then turned my big strip into a tube. I added a casing for an elastic waistband, and a small ruffle on the bottom, and that was it! It was much easier than it looks.
Subscribe to:
Comments (Atom)


